Showing posts with label Photoshop. Show all posts

Monday, May 9, 2011

Tips for Beginners


If most of you are like me, your photoshop files are a mess. We have layer upon layer with no specific name. Our files are filled with layers called “shape 42″ and “Vector Smart Object 3″. Sure we may know that “layer 47″ is the green fade that overlays our twitter bird but what about those of us that work in a corporate environment where multiple people may work on a single photoshop file? Or what about that photoshop file you worked on for a client 2 years ago and they want that weird little update, are you going to remember what those unnamed layers are? Organization is key!
Here are a couple of tips when trying to organize your photoshop file.
Revealed Photoshop Secrets


1) If you hold down ALT+CTRL+SHIFT (Mac: CMD+OPT+SHIFT) while starting Photoshop you can reset all the Photoshop settings back to factory default. Very usefull if you have problems with some tools or the interface.
2) One of my favorites. ALT+Click on the “eye” icon in the layer’s palette to hide all other layers.
3) Do you have trouble to find the cursor when you work with large canvases?
Simply press the spacebar and you’ll see the hand icon where the cursor is located.
4) When you are applying a “drop shadow” layer effect, try to leave open the dialog box.
You’ll be able to move the shadow with a simple drag and drop.

Photoshop Tool Secrets


1. Quickly Access Related Tools

  1. Hold alt and click on a particular tool’s icon to toggle related tools.

2. The Move Tool

  1. Hold CTRL to access the Move tool at anytime.

18 Useful Photoshop Shortcuts


Simple Photoshop Shortcut Commands

  • H (Hand Tool) — When zoomed in to a portion of your photo, this command brings up the hand tool which allows for quick panning. Also, if the hand tool is active and you hold down the Ctrl key, you can zoom in without changing to the zoom tool. Likewise, if you hold down the Alt key, you can zoom out without changing tools.

Photoshop Secret Shortcuts


It is proven that by using software shortcuts can boost up productivity. Here are 30 secret Photoshop shortcuts that I've learned from years of experience. Well, what I mean by "secret" is that these shortcuts are not documented in the menus. Keep reading and you will find how these shortcuts can speed up your productivity. I bet you don't know all of them.
Note: this article is written in Mac Photoshop format. If you are using PC, Cmd = Ctrl and Opt = Alt.

Working with Palettes


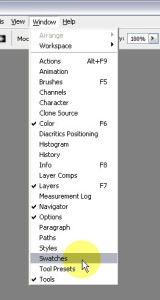
In order to show a palette in your workspace, go to the “Window” menu, then choose the palette you want to display, in this case, the “Swatches” palette.
Palettes (1)
Now, go to the top right of the palette, where a small “menu arrow” is, and click that arrow to open the menu.

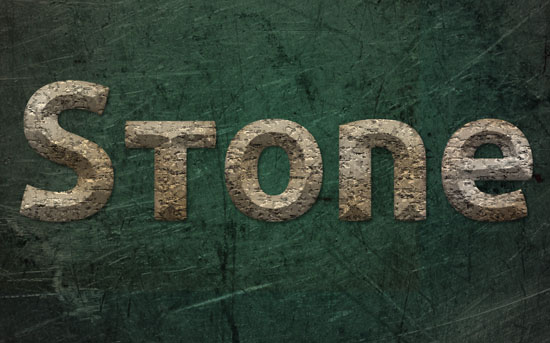
Stone Text Effects


This tutorial will explain how to create a stone-like texture using some filters, and a beveled style to place the texture on, in order to create a nice old-looking stone text effect.
The Final Result:
Stone
Notes:
* the software used in this tutorial is Adobe Photoshop CS5 Extended
* the size of the final result image is 1024 * 768

Photoshop Tool Basics


A quick summary of Photoshop’s Tools palette with a description of each tool’s functions and shortcuts. Great for those brand new to Photoshop.
I decided to start at the beginning. The very beginning. For those people who just “picked up” a copy of Photoshop and have no idea what to do with it. The keyboard shortcut is in ( ).
tool_basics1
Rectangular Marquee Tool (M)
Use this tool to make selections on your image, in a rectangular shape. This changes the area of your image that is affected by other tools or actions to be within the defined shape. Holding the [Shift] key while dragging your selection, restricts the shape to a perfect square. Holding the [Alt] key while dragging sets the center of the rectangle to where your cursor started.

Simple Fireflies Text Effect


In this tutorial, we will be using one of the Photoshop CS5 new painting brushes to create a firefly-like text, and then apply some glow to make it shine!
The Final Result:
Fireflies

3D Textured Text Effect


Preview of Final Results

3D textured text

3D Textured Text Photoshop Tutorial

Wednesday, March 16, 2011

Magic Lighting Effect


1 - Create a radial gradient, in this case from a purple to a really dark purple
2 - Here I added a really cool Icon of a magic hat 

MP3 Player Design


In this tutorial you will learn how to design a product in Photoshop. The product is a RCA Lyra X3030 portable media player. Although the chances are, you are thinking "why would I need to make it?", the reason for this tutorial is to teach people the techniques used for mocking up a product design.
Step 1 diagram

Step 2

Start with a large black canvas. Choose the rounded rectangle tool and set radius setting to 20px. *** NEED BR *** In a new layer draw a #F6F5F3 round rectangle. (width: 417 x height: 268). In your canvas, marquee select your header size which will be filled with a gradient effect. Height of 60px and width of 800px. And then add the following layer styles: Inner Shadow
Step 2 diagram