Friday, April 29, 2011

HTML Image Maps - XIII


Image maps are images with clickable areas (sometimes referred to as "hotspots") that usually link to another page. If used tastefully, image maps can be really effective. If not, they can potentially confuse users.
To create an image map:
  1. First, you need an image. Create an image using the usual method (i.e. via an image editor, then save as a gif or jpeg into your website's image folder).
  2. Use the HTML map tag to create a map with a name. Inside this tag, you will specify where the clickable areas are with the HTML area tag
  3. Use the HTML img tag to link to this image. In the img tag, use with the usemap attribute to define which image map to use (the one we just specified).
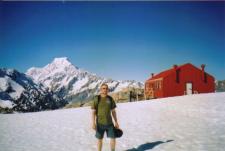
Image Map Example

HTML Code:

<img src ="/pix/mueller_hut/mueller_hut_t.jpg"
width="225" height="151" border="0"
alt="Mueller Hut, Mount Cook, and I"
usemap ="#muellermap" />

<map id ="muellermap"
name="muellermap">
  <area shape ="rect" coords ="90,80,120,151"
  href ="javascript:alert('Me');"
  alt="Me" />
  <area shape ="poly" coords ="55,55,120,80,90,80,90,100,70,100,20,80,55,55"
  href ="http://en.wikipedia.org/wiki/Mount_Cook"
  alt="Mount Cook" />
  <area shape ="poly" coords ="145,80,145,100,215,90,215,80,180,60,145,80"
  href ="http://www.natural-environment.com/places/mueller_hut.php"
  alt="Mueller Hut" />
</map>
This results in:
Mueller Hut, Mount Cook, and I
OK, compared to our previous lessons, this code is looking quite complex. However, once you really study it, it is not that complex. All we are doing, is specifying an image, then we are creating a map with coordinates. The hardest part is getting all the coordinates right.
In our example, we use the area in conjunction with the shape and coord attributes. These accept the following attributes:
shapeDefines a shape for the clickable area. Possible values:
  • default
  • rect
  • circle
  • poly
coordsSpecifies the coordinates of the clickable area. Coordinates are specified as follows:
  • rect: left, top, right, bottom
  • circle: center-x, center-y, radius
  • poly: x1, y1, x2, y2, ...
You can use the above attributes to configure your own image map with as many shapes and clickable regions as you like.

HTML Tables - XII


In HTML, the original purpose of tables was to present tabular data. Although they are still used for this purpose today, many web designers tended to use tables for advanced layouts. This is probably due to the restrictions that HTML has on layout capabilities - it wasn't really designed as a layout language.
Anyway, whether you use tables for presenting tabular data, or for page layouts, you will use the same HTML tags.

Basic table tags

In HTML, you create tables using the table tag, in conjunction with the tr and td tags. Although there are other tags for creating tables, these are the basics for creating a table in HTML.
HTML Code:

<table border="1">
<tr>
<td>Table cell 1</td><td>Table cell 2</td>
</tr>
</table>

This results in:
Table cell 1Table cell 2
You'll notice that we added a border attribute to the table tag. This particular attribute allows us to specify how thick the border will be. If we don't want a border we can specify 0 (zero). Other common attributes you can use with your table tag include widthwidth,cellspacing and cellpadding.
You can also add attributes to the tr and td tags. For example, you can specify the width of each table cell.
Widths can be specified in either pixels or percentages. Specifying the width in pixels allows you to specify an exact width. Percentages allows the table to "grow" or "shrink" depending on what else is on the page and how wide the browser is.
HTML Code:

<table border="1" cellpadding="5" cellspacing="5" width="100%">
<tr>
<td width="20%">Table cell 1</td><td>Table cell 2</td>
</tr>
</table>

This results in:
Table cell 1Table cell 2

Table Headers

Many tables, particularly those with tabular data, have a header row or column. In HTML, you can use the th tag.
Most browsers display table headers in bold and center-aligned.
HTML Code:

<table border="1" cellpadding="5" cellspacing="5" width="100%">
<tr>
<th>Table header</th>
</tr>
<tr>
<td width="20%">Table cell 1</td><td>Table cell 2</td>
</tr>
</table>

This results in:
Table headerTable header
Table cell 1Table cell 2

Colspan

You can use the colspan attribute to make a cell span multiple columns.
HTML Code:

<table border="1" cellpadding="5" cellspacing="5" width="100%">
<tr>
<th colspan="2">Table header</th>
</tr>
<tr>
<td width="20%">Table cell 1</td><td>Table cell 2</td>
</tr>
</table>

This results in:
Table header
Table cell 1Table cell 2

Rowspan

Rowspan is for rows just what colspan is for columns (rowspan allows a cell to span multiple rows).
HTML Code:

<table border="1" cellpadding="5" cellspacing="5" width="100%">
<tr>
<th rowspan="2">Table header</th><td>Table cell 1
</tr>
<tr>
<td>Table cell 2</td>
</tr>
</table>

This results in:
Table headerTable cell 1
Table cell 2

Color

You can apply color to your table using CSS. Actually, you can apply any applicable CSS property to your table - not just colors. For example, you can use CSS to apply width, padding, margin, etc
HTML Code:

<table border="1" cellpadding="5" cellspacing="5" width="100%">
<tr>
<th style="color:blue;background-color:yellow;" rowspan="2">Table header</th><td>Table cell 1
</tr>
<tr>
<td>Table cell 2</td>
</tr>
</table>

This results in:
Table headerTable cell 1
Table cell 2

HTML Forms - XI


HTML enables us to create forms. This is where our websites can become more than just a nice advertising brochure. Forms allow us to build more dynamic websites that allow our users to interact with it.
An HTML form is made up of any number of form elements. These elements enable the user to do things such as enter information or make a selection from a preset options.
In HTML, a form is defined using the <form></form> tags. The actual form elements are defined between these two tags.

The Input Tag

This is the most commonly used tag within HTML forms. It allows you to specify various types of user input fields such as text, radio buttons, checkboxes etc.

Text

Text fields are used for when you want the user to type text or numbers into the form.
<input type="text" />

This results in:

Radio Buttons

Radio buttons are used for when you want the user to select one option from a pre-determined set of options.

<input type="radio" name="lunch" value="pasta" /><br />
<input type="radio" name="lunch" value="rissotto" />

This results in:

Checkboxes

Checkboxes are similar to radio buttons, but enable the user to make multiple selections..

<input type="checkbox" name="lunch" value="pasta" /><br />
<input type="checkbox" name="lunch" value="rissotto" />

This results in:

Submit

The submit button allows the user to actually submit the form.
<input type="submit" />

This results in:

Select Lists

A select list is a dropdown list with options. This allows the user to select one option from a list of pre-defined options.
The select list is created using the select in conjunction with the option tag.

<select>
  <option value ="sydney">Sydney</option>
  <option value ="melbourne">Melbourne</option>
  <option value ="cromwell">Cromwell</option>
  <option value ="queenstown">Queenstown</option>
</select>

This results in:

Form Action

Usually when a user submits the form, you need the system to do something with the data. This is where the action page comes in. The action page is the page that the form is submitted to. This page could contain advanced scripts or programming that inserts the form data into a database or emails an administrator etc.
Creating an action page is outside the scope of this tutorial. In any case, many web hosts provide scripts that can be used for action page functionality, such as emailing the webmaster whenever the form has been completed. For now, we will simply look at how to submit the form to the action page.
You nominate an action page with the action attribute.
Example HTML Code:

<form action="/html/tags/html_form_tag_action.cfm" method="get">
First name:
<input type="text" name="first_name" value="" maxlength="100" />
<br />
Last name:
<input type="text" name="last_name" value="" maxlength="100" />
<input type="submit" value="Submit" />
</form>

This results in:
First name: 
Last name:  
Oh, one last thing. You may have noticed the above example uses a method attribute. This attribute specifies the HTTP method to use when the form is submitted.
Possible values are:
  • get (the form data is appended to the URL when submitted)
  • post (the form data is not appended to the URL)
Providing this attribute is optional. If you don't provide it, the method will be post.

HTML Comments - X


Before we go any further, I'd like to introduce the concept of comments. Although comments are optional, they can assist you greatly.
Comments are a part of the HTML code and is used to explain the code. This can be helpful for other HTML coders when trying to interpret someone elses code. It can also be useful for yourself if you have to revisit your code in many months, or even years time. Comments aren't displayed in the browser - they are simply there for the programmer's benefit.
You write comments like this:
<!-- Write your comment here -->
Comments always start with <!-- and end with -->. This tells the browser when a comment begins and ends.
Example HTML Code:

<-- Display a happy image --->
<img src="http://www.onlinetaleem.blogspot.com/pix/smile.gif"
 width="100" height="100" alt="Smile" />

This results in:
Smile
As you can see, the comment is invisible to the user viewing the page in the browser. It is there, simply for the HTML coder's benefit.
Well, we have now finished the first part of this tutorial. We have covered a lot, and by now, you have learned enough to build a website.
If you'd like to learn some of the more advanced HTML techniques, such as, how to create tables, frames, forms etc, please continue!

HTML Meta Tags - IX


Meta tags allow you to provide metadata about your HTML pages. This can be very useful for search engines and can assist the "findability" of the information on your website.

What is Metadata?

Metadata is information about, or that describes, other data or information.
If we relate this to a web page, if you think about it for a moment, you could probably come up with a lot more information about a web page than what you're actually displaying to the reader. For example, there could be a number of keywords that are related to the page. You could probably give the page a description. The page also has an author - right? All these could be examples of metadata.

Metadata on the Web

Metadata is a very important part of the web. It can assist search engines in finding the best match when a user performs a search. Search engines will often look at any metadata attached to a page - especially keywords - and rank it higher than another page with less relevant metadata, or with no metadata at all.

Adding Meta Tags to Your Documents

You can add metadata to your web pages by placing <meta> tags between the <head> and </head> tags. The can include the following attributes:
AttributeDescription
NameName for the property. Can be anything. Examples include, keywords, description, author, revised, generator etc.
contentSpecifies the property's value.
schemeSpecifies a scheme to use to interpret the property's value (as declared in the content attribute).
http-equivUsed for http response message headers. For example http-equiv can be used to refresh the page or to set a cookie. Values include content-type, expires, refresh and set-cookie.

Example HTML Code:

Keywords:
<meta name="keywords" content="HTML, meta tags, metadata" />
Description:
<meta name="description" content="Contains info about meta tags" />
Revision date (last time the document was updated):
<meta name="revised" content="taleem, 4/29/2011" />
Refresh the page every 10 seconds:
<meta http-equiv="refresh" content="10" />
The above examples are some of the more common uses for the meta tag.

HTML Images - VIII


Images make up a large part of the web - most websites contain images. HTML makes it very easy for you to embed images into your web page.
To embed an image into a web page, the image first needs to exist in either .jpg, .gif, or .png format. You can create images in an image editor (such as Adobe Photoshop) and save them in the correct format.
Once you've created an image, you need to embed it into your web page. To embed the image into your web page, use the <img /> tag, specifying the actual location of the image.

Example of Image Usage

HTML Code:
<img src="http://www.onlinetaleem.blogspot.com/pix/smile.gif" width="100" height="100" alt="Smile" />

This results in:
Smile
The img above contains a number of attributes. These attributes tell the browser all about the image and how to display it. Here's an explanation of these attributes:
srcRequired attribute. This is the path to the image. It can be either an absolute path, or a relative path (remember these terms from our last lesson?)
widthOptional attribute (but recommended). This specifies the width to display the image. If the actual image is wider, it will shrink to the dimensions you specify here. Likewise, if the actual image is smaller it will expand to your dimensions. I don't recommend specifying a different size for the image, as it will lose quality. It's better to make sure the image is the correct size to start with.
heightOptional attribute (but recommended). This specifies the height to display the image. This attribute works similar to the width.
altAlternate text. This specifies text to be used in case the browser/user agent can't render the image.

Image Alignment

You can determine how your images will be aligned, relative to the other content on the page (such as a paragraph of text). You do this using the align attribute.
HTML Code:

<p>
<img src="http://www.onlinetaleem.blogspot.com/pix/smile.gif"
 width="100" height="100" alt="Smile" align="right"/>
Here is a paragraph of text to demonstrate HTML images and how
they can be aligned to the right of a paragraph (or paragraphs)
if you so desire.</p> </p>This can be used to produce
some nice layout effects, especially if you have a lot of text,
and it runs right past the image.</p><p> Otherwise,
the image will just hang below the text and may look funny.</p>

This results in:
SmileHere is a paragraph of text to demonstrate HTML images and how they can be aligned to the right of a paragraph (or paragraphs) if you so desire.

This can be used to produce some nice layout effects, especially if you have a lot of text, and it runs right past the image.
Otherwise, the image will just hang below the text and may look funny.

Image Links

You can make your images "clickable" so that when a user clicks the image, it opens another URL. You do this by simply wrapping the image with hyperlink code.
HTML Code:

<a href="http://www.onlinetaleem.blogspot.com/html/tutorial">
<img src="http://www.onlinetaleem.blogspot.com/pix/smile.gif"
 width="100" height="100" alt="Smile" />
</a>

This results in:
Smile

Removing the Border

You might notice that this has created a border around the image. This is default behaviour for most browsers. If you don't want the border, specify border="0".
HTML Code:

<a href="http://www.onlinetaleem.blogspot.com/html/tutorial">
<img src="http://www.onlinetaleem.blogspot.com/pix/smile.gif"
 width="100" height="100" alt="Smile" border="0" />
</a>

This results in:
Smile


HTML Links - VII


Links, otherwise known as hyperlinks, are defined using the <a> tag - otherwise known as the anchor element.
To create a hyperlink, you use the a tag in conjunction with the href attribute (href stands for Hypertext Reference). The value of the href attribute is the URL, or, location of where the link is pointing to.
Example HTML Code:
Visit the <a href="http://www.onlinetaleem.blogspot.com/">Online Taleem Blog</a>

This results in:
Visit the Online Taleem

Hypertext references can use absolute URLS, relative URLs, or root relative URLs.
absolute
This refers to a URL where the full path is provided. For example, http://www.onlinetaleem.blogspot.com

Link Targets

You can nominate whether to open the URL in a new window or the current window. You do this with the target attribute. For example, target="_blank" opens the URL in a new window.
The target attribute can have the following possible values:
_blankOpens the URL in a new browser window.
_selfLoads the URL in the current browser window.
_parentLoads the URL into the parent frame (still within the current browser window). This is only applicable when using frames.
_topLoads the URL in the current browser window, but cancelling out any frames. Therefore, if frames were being used, they aren't any longer.

Example HTML Code:
Visit the <a href="http://onlinetaleem.blogspot.com" target="_blank">Online Taleem</a>

This results in:
Visit the Online Taleem

Named Anchors

You can make your links "jump" to other sections within the same page. You do this with named anchors.
To use named anchors, you need to create two pieces of code - one for the hyperlink (this is what the user will click on), and one for the named anchor (this is where they will end up).
This page uses a named anchor. I did this by performing the steps below:
  1. I created the named anchor first (where the user will end up)Example HTML Code:
    <h2>Link Targets<a name="link_targets"></a></h2>
  2. I then created the hyperlink (what the user will click on). This is done by linking to the name of the named anchor. You need to preceed the name with a hash (#) symbol.Example HTML Code:
    <a href="#link_targets">Link Targets</a>

This results in:
When you click on the above link, this page should jump up to the "Link Targets" section (above). You can either use your back button, or scroll down the page to get back here.
You're back? Good, now lets move on to email links.

Email Links

You can create a hyperlink to an email address. To do this, use the mailto attribute in your anchor tag.
Example HTML Code:
<a href="mailto:onlinetaleem@example.com">Email Online Taleem</a>

This results in:
Clicking on this link should result in your default email client opening up with the email address already filled out.
You can go a step further than this. You can auto-complete the subject line for your users, and even the body of the email. You do this appending subject and body parameters to the email address.
Example HTML Code:
<a href="mailto:onlinetaleem@example.com?subject=Question&body=Hey there">Email Online Taleem</a>

This results in:

Base href

You can specify a default URL for all links on the page to start with. You do this by placing the base tag (in conjunction with thehref attribute) in the document's head.
Example HTML Code:

<head>
<base url="http://www.onlinetaleem.blogspot.com">
</head>

HTML Colors - VI


In HTML, colors can be added by using the style attribute. You can specify a color name (eg, blue), a hexadecimal value (eg, #0000ff), or an RGB value (eg rgb(0,0,255)).

Syntax

Foreground Color

To add color to an HTML element, you use style="color:{color}", where {color} is the color value. For example:
<h3 style="color:blue">HTML Colors</h3>
This results in:

HTML Colors

Background Color

To add a background color to an HTML element, you use style="background-color:{color}", where {color} is the color value. For example:
<h3 style="background-color:blue">HTML Colors</h3>
This results in:

HTML Colors

Border Color

To add a colored border to an HTML element, you use style="border:{width} {color} {style}", where {width} is the width of the border, {color} is the color of the border, and {style} is the style of the border. For example:
<h3 style="border:1px blue solid;">HTML Colors</h3>
This results in:

HTML Colors

Color Names

The most common methods for specifying colors are by using the color name or the hexadecimal value. Although color names are easier to remember, the hexadecimal values and RGB values provides you with more color options.
Hexadecimal values are a combination of letters and numbers. The numbers go from 0 - 9 and the letters go from A to F. When using hexadecimal color values in your HTML/CSS, you preceed the value with a hash (#). Although hexadecimal values may look a little weird at first, you'll soon get used to them.
There are 16 color names (as specified in the HTML 4.0 specification). The chart below shows these color names and their corresponding hexadecimal value.
ColorColor NameHexadecimal ValueColorColor NameHexadecimal Value
Black#000000Green#008000
Silver#c0c0c0Lime#00ff00
Gray#808080Olive#808000
White#ffffffYellow#ffff00
Maroon#800000Navy#000080
Red#ff0000Blue#0000ff
Purple#800080Teal#008080
Fushia#ff00ffAqua#00ffff
You can make up your own colors by simply entering any six digit hexadecimal value (preceeded by a hash). In the following example, we're using the same code as above. The only difference is that, instead of using "blue" as the value, we're using its hexadecimal equivalent (which is #0000ff):
<h3 style="color:#0000ff">HTML Colors</h3>
This results in:

HTML Colors

If we wanted to change to a deeper blue, we could change our hexadecimal value slightly, like this:
<h3 style="color:#000069">HTML Colors</h3>
This results in:

HTML Colors

Choosing Colors - The Easy Way

By using hexadecimal or RGB color values, you have a choice of over 16 million different colors. You can start with 000000 and increment by one value all the way up to FFFFFF. Each different value represents a slightly different color.